


Acquiring customers is always towards the top of business grumbles. That’s why when you get them, you want to grip them tight and never let them go.
If you want to keep customers, you need to provide value. That value needs to be recognised, so you need to communicate. When you communicate it needs to be done in the right way and at a time that’s relevant. When you view your business through a customer delight lens, everything should be focused around driving value and communicating value. This is how you build a renewals-based business.
If you’re fortunate enough to have more than a handful of customers, then you’re going to need a system. One that works independently of you having remember to do anything. Otherwise, your business (and probably life) is going to get in your way.
As always with Inflowing content, this blog post isn’t meant to be prescriptive. Rather, it’s a set of guidelines that you can hack and slash to suit your individual circumstances.
For the purposes of this blog, we use a marketing automation system to do this. You can also do the same thing in any CRM system worth its salt.
In our example, we use ActiveCampaign, as it’s fastly becoming the marketing automation system of choice for disgruntled marketers fed up with having to pay thousands of pounds each year in license costs to power their marketing efforts.
Creating your custom fields
Creating a Contract End date
Our starting point is to tell the system when your customer contracts expire. When we have this date in, we can use it to do cool stuff.
1) Within ActiveCampaign, Click Forms. Using the drop down in the top left corner, click ‘Manage Fields’.
2) Click the green button in the top right hand corner ‘New Custom Field’.
3) Select ‘Date’ and call your new field ‘Contract End Date’.
Creating Customer Status
Now we’re going to create another field. Repeat steps 1 and 2 , but this time when we get to step 3, select ‘Drop Down Menu’. Then, add ‘Status’ as the name and throw in the options as shown in the image below. This is how to make sure we’re doing the right things with the customer at the right time.
Creating your automations
Now we have the fields, we want them to put them to work independently of our input. To do this, we’re going to create some automations.
For this example, we’re going to be working with the following lifecycle stages (this is what we use internally if you were wondering). If they don’t work for you adapt and tweak: likewise with the timescales associated with them. As you can see from the table below, what we’re doing is working the lifecycle stages back from the contract end date.
Table 1: lifecycle status and time before contract end date.
| Lifecycle status | Time before Contract end Date |
| Onboard | 12 months |
| Deliver value | 10 months |
| Growth | 6 months |
| Renew | 3 months |
| Exchange contracts | 1 month |
Onboarding
This is the starting point. When you add a contract end date for your customer, you want their status to go to the onboarding phase.
To do this, we need to set up an automation. If you’re not comfortable with setting up automations, it’s probably worth checking out some basic training on how to do this (link to AC videos) first.
With a basic understanding of automations assumed, we want the ‘Status’ field to be changed to ‘Onboarding’ when we add a customer end date.
1) Name the automation ‘Customer (Onboarding stage)’
2) Select the Start Trigger as ‘Field Changes’
3) In field, select ‘Contract End Date’
4) Use the options below to make sure that you’re able to cope with the onboarding of historic or lapsed customers. After all, onboarding is an onboarding!
5) Now, you’ll want to add your Action. Click on the ‘+’ sign that comes up in your automation builder. On the left, select ‘Contacts’ and ‘Update Contact’ on the right.
6) Select ‘Status’ and then ‘Onboarding’ ,and click Save
7) Setup a notification to email you when someone new starts. We use this to serve as a pat on the back for the team. Now with notifications, think about what you actually want to say here. Rather than a generic ‘Name has completed automation’ think what you actually want your people to do with this information. Here’s what ours looks like:
Here’s what your end product should look like.
Deliver value
We’re going to step through one of these in detail, and then explain how you can tweak what we’ve done to go through the other automations in the time it takes to brew a coffee.
1) Name your automation ‘Customer (Deliver value stage)’
2) Select the Start Trigger as ‘Field Changes’
3) This time, we’re going to select ‘Date Based’
4) Configure your date to fall in line with the dates you set out for ‘Status’. For this example, we’ll use what we put in Table 1 earlier.
5) Using the ‘+’ sign, we’re once again going to add an action. Select ‘Contact’ on the left, and then ‘Update Contact’ on the right.
6) Select ‘Status’ and then ‘Deliver value’ ,and click ‘Save’
7) Set up a notification. Again – think! What do you want your people to do during the deliver value stage?
Here’s what this one should look like at this point.
As you can see, it’s pretty straightforward. The formula for the remaining lifecycle stages has already been mastered. For ease of use, you can now just clone those automations and tweak.
Cloning and tweaking the other stages
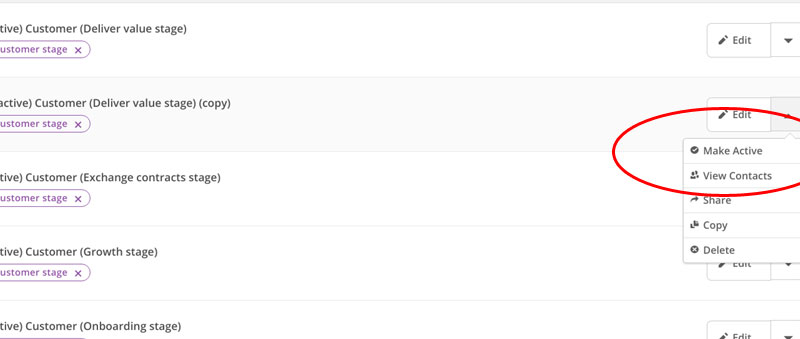
1) Click ‘Automations’ along the top to go to your automations list. On the drop down menu on the right hand side, select ‘Copy’.
2) Click on the new version of your automation, the one that ends with ‘(copy)’.
3) Change the name of the automation to reflect the lifecycle stage ‘Customer (STAGE NAME)’.
4) Click on the date that the automation starts. Change the date to reflect your take on Table 1. In our example, it would be 6, 3 and 1 to reflect ‘Grow’, ‘Retain’ and ‘Exchange’ contacts respectively.
5) Click on the ‘Contact Field Status’ and change to your desired Stage.
6) Change the content within your notification email. You know the score with this by now! All you’ll need to do now, is make sure you make all of your automations Active. Click Automations along the top, and then on the drop down menu on the right of each automation select ‘Make Active’. Obviously you’ll need to do this for each of your automations.
Automation can drive retention
And there you have it. The way the automations have been set up, the system will keep retriggering and support annual recurring revenues in a 12 month contracted period for B2B.
This is a simple way to make marketing automation an intrinsic part of your customer retention strategy. It helps you to do the right things at the right time with each customer. If you then do everything you say you’re going to do, and your customer retains into another contracted period, these workflows will just keep going.
I would point out at this stage, proactively managing customer retention is certainly about more than setting up a few automations. If you can face-to-face too, there’s no beating the personal connection you can make with someone in-person. I see technology as really being a way to manage that at scale. Also, it’s the reason I kept banging on about notifications. It’s those prompts to make sure that as humans, we do what’s right the customer when we should: both online and offline.