Confession: up until about 2 months ago, as someone who has worked in digital marketing for 6 years, I didn’t know how to set up events tracking properly.
I know, please don’t judge me.

If you’re unsure as to what exactly I’m talking about, events tracking is a really handy feature in Google Analytics. When used in conjunction with goals, it allows you track and measure the conversion rates of identified – you guessed it – goals. These can be anything you want your customers to do on a website – download a brochure, play a video, or fill in a form. They can even be more engagement based – i.e. a goal is completed if a user spends x minutes on your site, or visits x pages.
Destination, Duration and Pages/Screens per session goals, as they’re known in Analytics, are pretty easy to set up. You select which option you’d like to use, enter the relevant information, and you’re good to go.
For example:


You can do some more fancy things here using regular expression to track multiple pages and types of pages, but the general concept is pretty simple – every time a user visits that page, Analytics records a goal completion.
This is very easy if your goal has a destination, duration, or number of pages per session. What if your goal involves the click of a button? Or, most commonly
I find – you want to record a contact form submission as a goal, but you don’t have a thank you page to use as a destination.
This is a situation I found myself in a few months ago, and this is what I learned.
I apologise for the slightly gratuitous use of Drag Race GIFs in this article.
Setting up events tracking and goals with the help of Google Tag Manager
First of all, Google’s guidance on the matter is a bit confusing and difficult to follow, unless you’re a developer.
![]()
Buh?

If you have a developer handy, then great! Good for you. Close this blog post, go and get yourself a cuppa (preferably get your developer one too) and set them off and running setting this up for you.
If you don’t – read on.
Google Tag Manager
Google Tag Manager does what it says on the tin – it manages tags. Essentially, you can use a singular container within your code to host multiple tags, instead of having to fiddle about with individual tags for things like Analytics, marketing automation and ABM platforms, etc. It’s super easy to set up, so if you haven’t already – do that now.
For this to work, you’ll also want your Analytics tracking running through Tag Manager. Mercifully, this is also pretty simple – instructions here.
Events tracking
Right, on to the meaty bit.
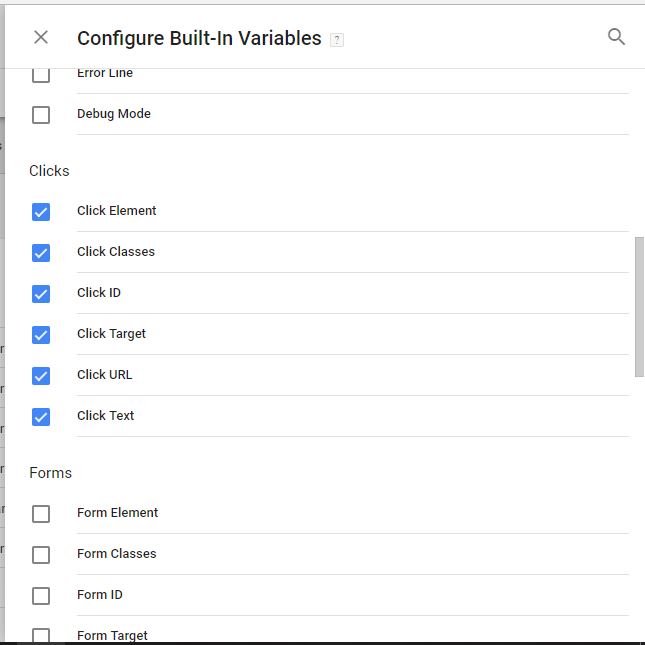
Before we do anything, you’ll need to make sure you have the “Click” variables setup in Tag Manager.
Go to Variables on the main dashboard, then click the big red “Configure” button.
A little sidebar should pop out – you’ll see that everything under “Pages” is ticked. Scroll down a little bit and make sure everything under “Clicks” is ticked.

Click away from this menu and it’ll auto-save.
To add your event tracking, go back to the Dashboard, click “Tags” and “New”.
Give your Tag a catchy name like “Goal tracking”, then click “Tag Configuration”.
Another little sidebar will pop out – in this sidebar, select “Universal Analytics”.
Under your Tag Configuration, under Track Type, select “Event”.
You’ll want to fill in the Category, Action, Label and Value fields here (if your goal doesn’t have a value, just leave it blank). Make a note of these!
This might look something like:
![]()
Under “Google Analytics settings”, select {{Google Analytics}} – this just makes sure all the settings are pulled through to this tag.
Right, now we’ve set that up, let’s look at the trigger.
Essentially, this is where we tell Tag Manager the conditions in which we want the tracking code to kick in – i.e. when someone clicks “submit” on your form.
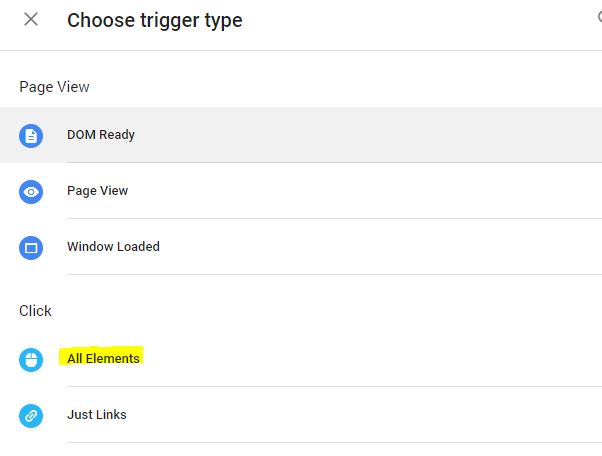
Underneath the Tag setup, click on Triggering. You’ll then be prompted to choose a trigger. You’ll want to set a new one up for your click conditions. Click the plus symbol in the top right hand corner. You’ll get another sidebar.
Name your Trigger something catchy like “Contact form trigger” and click in the “Trigger Configuration” space. Another sidebar!
Under “Click” select “All Elements”.

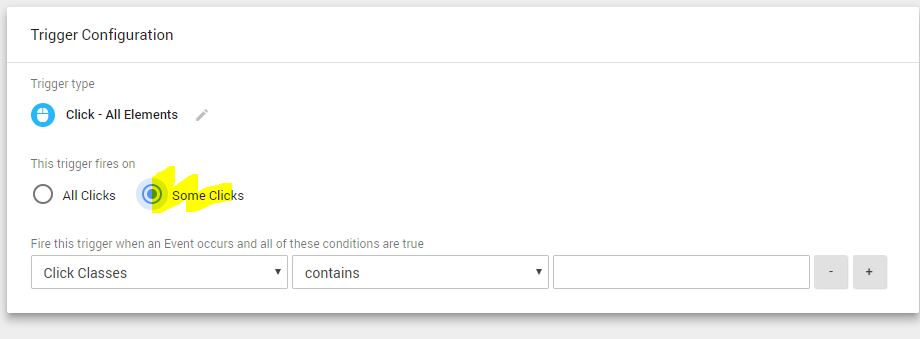
Then make sure you’ve selected the radio button “some clicks” – we don’t want every single click on the site to be recorded, only some specific ones.

Now, this is where it can get a little tricky, depending on how your form or the link in question is set up.
If your link or button has a text element – so it’s a pure text link, or text styled as a button, you can select “Click Text” here. You can then use different match types, such as contains, starts with, equals, etc, but I find for maximum accuracy it’s useful to use “equals”. Enter the button text as it appears on the site – if you’re using equals, this is case-sensitive.
To check if your button fits this criteria, open your site in Google Chrome, right click the button and select “Inspect”. The Inspector should highlight the bit of code that refers to your button. If text of the button appears outside of the button tag, like this:

Then you know you can use the Click Text trigger.
If it appears something like this – i.e. inside the button tag, then it’s slightly more complicated, and I would suggest you use this guide for further help on setting up a trigger for this instance. Note – if you use Contact Form 7 for forms on your site, this is how their code is set up.
![]()
Anyway, back to the setup in Tag Manager.
Click “Save”.
You’ll then be taken back to your Tag configuration screen. Check everything looks good, and click Save.
Congratulations, you’ve just created an event tracking tag!

Now, you’ll want to tie this up to a Goal in Analytics. If you don’t do this for whatever reason, don’t worry, the Event will still pull through into Google
Analytics, and you’ll be able to see it under Behaviour > Events.
But, if you do want to tie it to a Goal, here’s how.
Syncing your event with a goal in Analytics
Login to Analytics and navigate to relevant property for the website you’re working on.
In the bottom corner, click the little cog icon.
In the far right column, click “Goals” (it’s got a little flag icon).
Click the red button “New Goal”.
Give it a catchy name like “Contact form” (I’m so good at catchy names).
Under “Type” select “Event”, and click “Continue”.
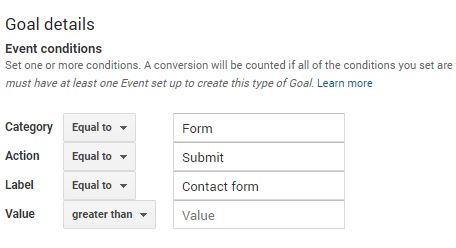
NOW – remember when I told you to make note of what you set your Category, Action, Label and Value as in Tag Manager? It’s OK, I know you didn’t. Go back and check now. I’ll wait.

You’ll want to set these to exactly the same as the Event tracking configuration in Tag Manager, otherwise the Events won’t pull through as Goals. So, working through the example from earlier, that would look like this.

Click “Save”. And you’re done! Make sure your Goal is set to “On” under Recording, and everything should start pulling through. You might want to do a few tests of your form to check the tracking is working correctly. Be patient when it comes to the Goals though, it can take a little while for the system to convert the Event to a Goal.
A bit of advice from me here – if you find after a couple of attempts the Goals still aren’t pulling through, double check the Event conditions match those in
Tag Manager. The majority of the times my Goals haven’t been working, it’s because of this.
So there you have it – you should now be off and running tracking your Events and measuring their effectiveness using Goals!

Need some help driving more conversions on your site? Talk to us.
