When it comes to Marketing, there’s options in most areas. Target lists for campaigns can be segmented by industry, attending specific industry events or targeting industry magazines or blogs with guest blogs or press releases. It’s not all rosy though. And the one area where companies have had to sacrifice also happens to be the cornerstone of most businesses’ entire marketing options….the company website.
Websites have historically been a nightmare for the multiple industry business. How you develop messaging that speaks to the diverse challenges of companies in completely different markets is a real headache. Clunky hack-arounds like having ‘sectors’ pages on the website goes some of the way, but what about your homepage? What should be the message here? Or your product/services pages – the ones that feature vital sales information. What to do here?
We’ve all had to play it safe by playing it generic. Suffice to say, conversion rates have suffered as a result of assuming this middle ground.
That is until now. With the development of software like ABM for WordPress it’s now possible to show B2B visitors specific information that is relevant to their industry, while at the same time showing B2B visitors from other key industries specific information too. It’s website personalisation for the multi-industry business and we’re gonna step you through how to do industry personalisation in WordPress using the ABM for WP plugin.
It’s best to think of this way of personalisation through an ‘If This Then That’ lens. If a company belongs to this industry, show them this content.
IT Industry example
In this example below, we’re going to create some specific content for organisations in the IT Industry.
Step 1: Navigate to the ABM for WP personalisation builder (at the bottom of the page or post you want to personalise).
Step 2: In the 1st box select ‘Flexible’ personalisation type.
Step 3: In the 2nd box, select ‘’Category (NAICS)”.
Step 4: In the 3rd box, Type in ‘Computer’ and the ABM for WP predictive text engine will bring through a list of all IT related disciplines. Click on each one you want to add. Hint. ABM for WP supports multiple categories. Once you’ve added one you can type in the box again to add a second, third and so on.
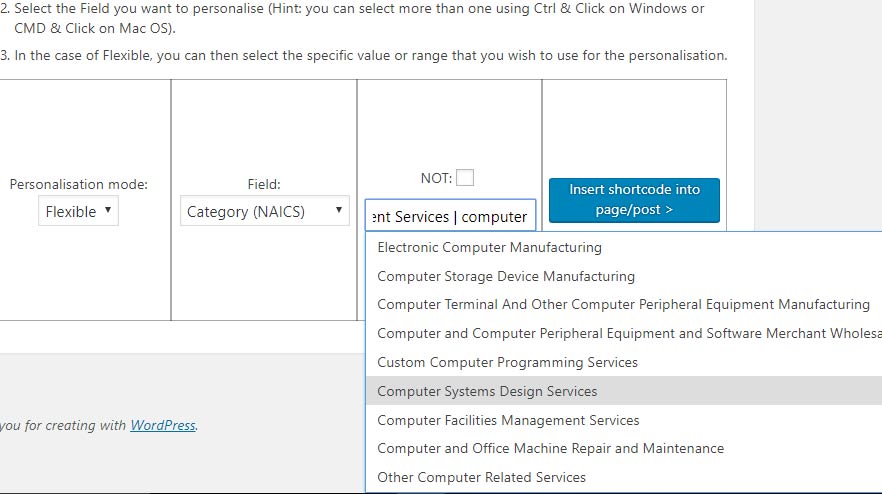
Step 5: In the last box on the right, click ‘Insert Shortcode into page/post’.
You can now build out the messaging that you want IT companies visiting your website to see. You do this by typing this tech-focused text and images between the shortcode tags.
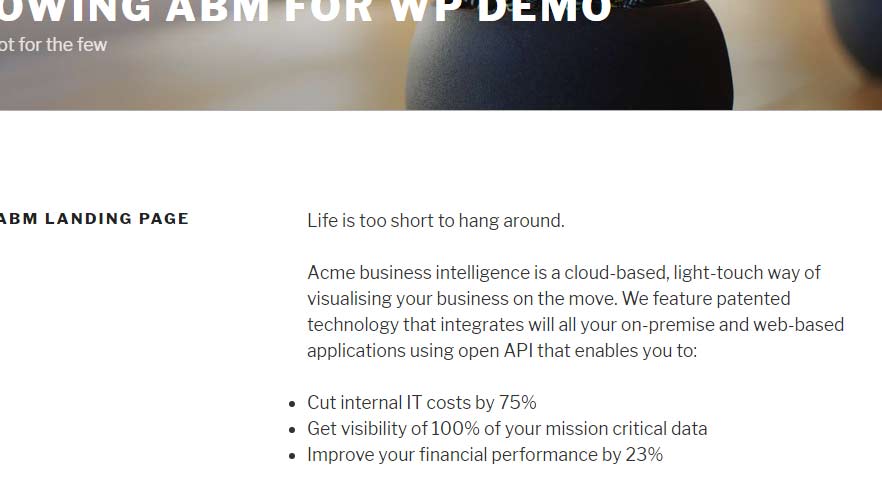
You might end up with a page that looks something like this.
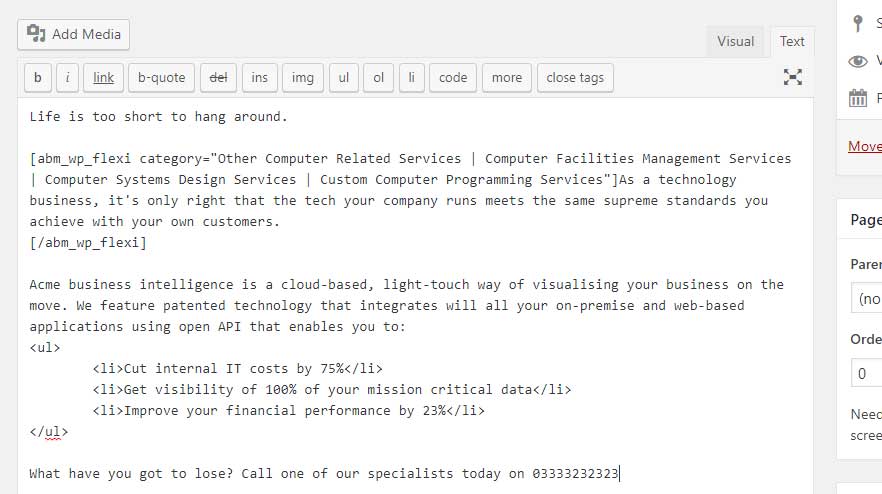
There are a couple of different ways to achieve the same thing here. If you work with NAICS/SIC codes, you can also use the codes if you find that easier instead. You follow the same steps outlined above and juxtapose.
Getting more advanced with industry
As you get more sophisticated with how to do industry personalisation in WordPress, there are a couple of opportunities to make ABM for WP work harder for you.
‘NOT’ logic
You can also add ‘NOT’ logic into your page too. You would follow the steps 1-5 above in exactly the same fashion, with the slight deviation of adding the tick box for ‘NOT’ in box 3. You can then copy the text from your IT-focused messaging and make it more generic for your other audiences. This is a light-touch way of making sure you’ve got all bases covered.
Multiple industry personalisations
The real ABM gurus would build out similar personalisations for all the industries that their company sells into. Depending on the business, this could be anywhere up to a dozen personalisations. This means that when any of your prospects or customers end up on this landing page, the copy is optimised to deliver the most relevant conversion copy possible. This is optimum when it comes to personalising for different industries using ABM for WP, but requires slightly more time spent on covering all bases.
Testing your personalisations
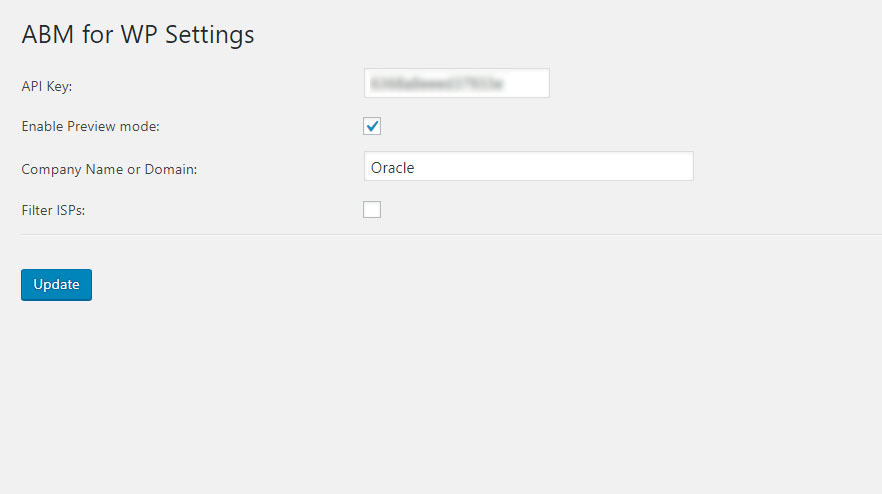
Now you have some industry personalisations, it’s strongly advisable to test them out. Using the ABM for WP Preview Mode you can view your pages as any number of different companies.
As we’ve done a personalisation focused on IT business, let’s use Oracle Corporation to test out our handy work.
Hover your mouse over the ABM for WP menu on the left-hand WordPress menu bar, and then click settings.
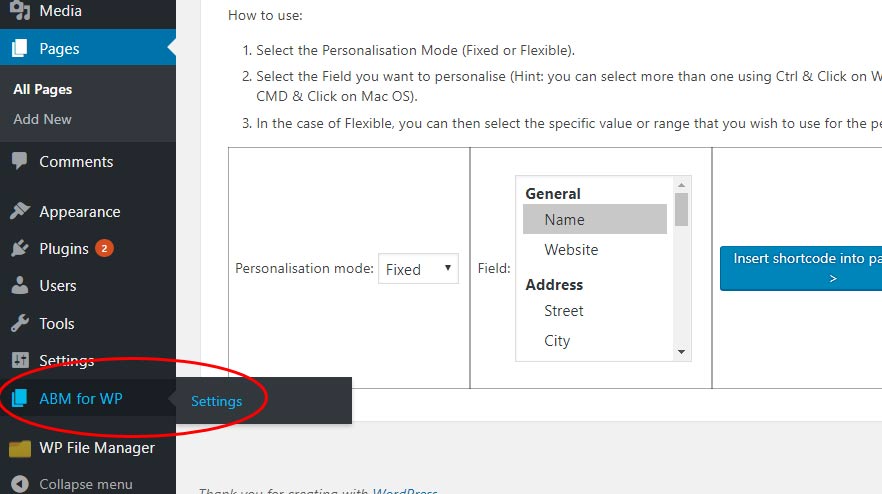
Tick preview mode – and then select Oracle Corporation.
Click the ‘Update’ button and navigate back to the page you’ve built. Clicking ‘Preview’ will show you the site as if you’re visiting from one of Oracle’s fancy offices.
We’re here to help
If you need any help, then just reach out to us. We’d love to help you get on your journey.
